
最近协会购置了一些 ESP32 开发板,又让我想起来了上半年想用 Arduino UNO 制作电子桌宠,限于这块开发板只能进行单线程执行任务,而桌宠的四肢运动运动的舵机需要 异步 进行运转,所以这个项目也就搁浅了。而 ESP32 能给我们带来的是高性能、双核心,多线程任务执行变的可以预想。所以我将以项目为导向的方式,逐一学习!

S1 多任务点灯
S1.1 创建多任务
void task1(void *pt){
  pinMode(21, OUTPUT);
  while(1){
    digitalWrite(21, !digitalRead(21));
    vTaskDelay(pdMS_TO_TICKS(1000));
  }
}

void task2(void *pt){
  pinMode(33, OUTPUT);
  while(1){
    digitalWrite(33, !digitalRead(33));
    vTaskDelay(pdMS_TO_TICKS(2000));
  }
}

void setup() {
  // put your setup code here, to run once:
  Serial.begin(115200);
  Serial.println("Hello, ESP32-S2!");
  xTaskCreate(task1, "Bink 21", 1024, NULL, 1, NULL);
  xTaskCreate(task2, "Bink 33", 1024, NULL, 1, NULL);
}

void loop() {
  // put your main code here, to run repeatedly:
  delay(10); // this speeds up the simulation
}
使用 task1 和 task2 函数存放需要执行的任务,在 setup() 函数中会循环执行创建的任务。
值得注意的是 xTaskCreate(task1, "Bink 21", 1024, NULL, 1, NULL); 所代表的意思是
xTaskCreate(task1, "Bink 21", 1024, NULL, 1, NULL);
// xTaskCreate(任务函数, 任务名称,栈大小,传入参数,优先级,任务操作)

BaseType_t xTaskCreate( TaskFunction_t pxTaskCode, // 函数指针, 任务函数
const char * const pcName, // 任务的名字
const configSTACK_DEPTH_TYPE usStackDepth, // 栈大小,单位为word,10表示40字节
void * const pvParameters, // 调用任务函数时传入的参数
UBaseType_t uxPriority, // 优先级
TaskHandle_t * const pxCreatedTask ); // 任务句柄, 以后使用它来操作这个任务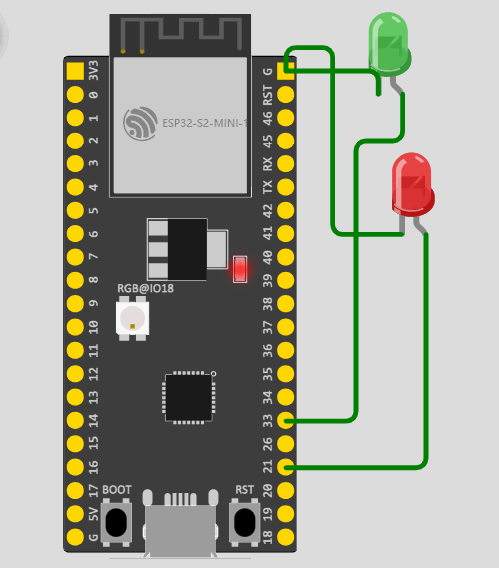
S1.2 多任务的传参
当我们需要给任务传入参数的时候(例如:传入输出引脚编号)就需要进行参数传入
S1.2.1 单参数的传入
C语言中的指针,包含了数据类型与字节长度,例如一个 Int 数据类型在 ESP32 中占用 4 字节(32bit)1bit = 1地址,从 #666 地址位置传入一个int 结束为#666+32 bit 地址。
我们可以使用 钩子 引出指针所在的地址 int* ptr,举个例子
int B = *ptr;
int B = 100;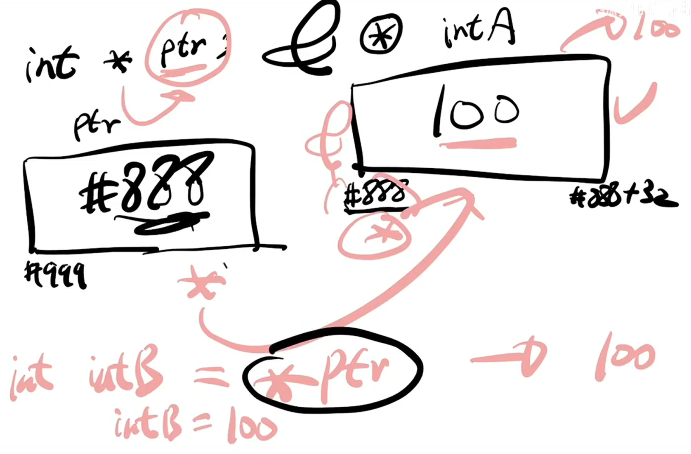
byte LED_PIN_1 = 34;
byte LED_PIN_2 = 35;

void task1(void *pt){
  byte * pbLEDPIN;
  pbLEDPIN = (byte *)pt;

  byte LEDPIN;
  LEDPIN = *pbLEDPIN;

  pinMode(LEDPIN, OUTPUT);
  while(1){
    digitalWrite(LEDPIN, !digitalRead(LEDPIN));
    vTaskDelay(pdMS_TO_TICKS(1000));
  }
}

void task2(void *pt){
  byte LED_PIN = *(byte *)pt;
  pinMode(LED_PIN, OUTPUT);
  while(1){
    digitalWrite(LED_PIN, !digitalRead(LED_PIN));
    vTaskDelay(pdMS_TO_TICKS(2000));
  }
}

void setup() {
  // put your setup code here, to run once:
  Serial.begin(115200);
  Serial.println("Hello, ESP32-S2!");
  byte * pbLEDPIN_1;
  pbLEDPIN_1 = &LED_PIN_1;

  void *pvLEDPIN_1;
  pvLEDPIN_1 = (void *)pbLEDPIN_1;

  xTaskCreate(task1, "Bink 34", 1024, pvLEDPIN_1, 1, NULL);
  xTaskCreate(task2, "Bink 35", 1024, (void *)&LED_PIN_2, 1, NULL);
  //好像上面的(void *)可以省略(隐式转换)
}

void loop() {
  // put your main code here, to run repeatedly:
  //delay(10); // this speeds up the simulation
}
上面的代码块我们使用了两个参数传入的方法,一个是在外部进行一个一个变量数据类型、地址的转换(Task1),另外一个是在内部使用一条龙服务解决类型与地址的类型,特别要注意的是,Taks2函数 里面定义的 byte LED_PIN = *(byte *)pt; 的意思是,将 pt 变量变成 byte 数据类型,再用 非标 找到所在的地址,因为 pvParameters 只接受指针地址类型(用任何类型的数据变成通用的指针再变回来),所以有点麻烦。
S1.2.2 多参数的传入
我们可以发现,上面的 Task 函数有很多相同点,不同的只有 PINIO 号和延时长度,我们是不是有一种方法可以将两个函数合二为一,那么多参数的传入他就来了。
typedef struct {
  byte pin;
  int delayTime;
} LEDFLASH;

void ledFlash(void *pt){
  LEDFLASH * ptLedFlash = (LEDFLASH *)pt;
  byte pin = ptLedFlash->pin;
  int delayTime = ptLedFlash->delayTime;

  pinMode(pin, OUTPUT);
  while(1){
    digitalWrite(pin,!digitalRead(pin));
    vTaskDelay(delayTime);
  }
}

void setup() {
  // put your setup code here, to run once:
  Serial.begin(115200);
  Serial.println("Hello, ESP32-S2!");
  LEDFLASH led1, led2, led3;
  led1.pin = 34;
  led1.delayTime = 1000;
  led2.pin = 35;
  led2.delayTime = 2000;
  led3.pin = 36;
  led3.delayTime = 3000;

  if(xTaskCreate(ledFlash, "Flash Led", 1024, (void *)&led1, 1, NULL) == pdPASS)
  Serial.println("Flash Led1 turn on!");

  if(xTaskCreate(ledFlash, "Flash Led", 1024, (void *)&led2, 1, NULL) == pdPASS)
  Serial.println("Flash Led2 turn on!");

  if(xTaskCreate(ledFlash, "Flash Led", 1024, (void *)&led3, 1, NULL) == pdPASS)
  Serial.println("Flash Led3 turn on!");

}

void loop() {

}
通过上面的代码我们可以得出,在程序一开始,我们定义了一个 结构体 的方法函数传入数据。并且在 ledFlash() 函数中,我们使用了 健(->) 的方式来使用,将结构体里面的成员引用出来。
S2 使用相互排斥 Mutex 来解决竞争冒险Race Condition
当我们面临函数体的数据交换时,就需要面临读写操作,我们可以使用全局变量,但是在RTOS中使用全局变量,一定要注意有哪些任务会写这个变量,哪些任务会读这个变量。尤其切记在使用这个变量的过程中变量的数值发生改变,程序可能达不到预期的效果,程序出bug。
在一个全局变量作用与函数时,只能有一个写操作,可以有多个读操作
这里我们用线下库存来完成全局变量的学习
volatile uint32_t inventory = 100;
volatile uint32_t retailCount = 0;


void retailTask(void *pvParam){
  while(1){
    uint32_t inv = inventory;
    for (int i; i < random(10, 100); i++) vTaskDelay(pdMS_TO_TICKS(i));
    if (inventory > 0){
      inventory = inv -1;
      retailCount++;
    }
  }

  vTaskDelay(10); //老板要求慢一些,客户升级后,可以再加快速度
}

void showTask(void *pvParam){
  while(1){
    printf("Inventory: %d\n", inventory);
    printf("Retail: %d\n", retailCount);
  }

  if(inventory == 0){
    printf("\n--- SALES SUMMARY ---\n");
    printf("Total Sales: %d\n\n", retailCount);
  }
  vTaskDelay(pdMS_TO_TICKS(100));
}

void setup() {
  // put your setup code here, to run once:
  Serial.begin(115200);

  xTaskCreate(retailTask,
              "Online Channel",
              1024 * 4,
              NULL,
              1,
              NULL);

  xTaskCreate(showTask,
              "Display Inventory",
              1024 * 4,
              NULL,
              2,
              NULL);

}

void loop() {
}
这个代码在 ESP32 S2 似乎不起作用
当业务拓展到中后期,线下已经不能满足我们的需求,所以退出线上购买渠道,但是仍然采用上面的方法会导致抢库存,库存为负的情况,这里我们需要用互锁 Race Condition (共享资源被多人访问的困扰)
volatile uint32_t inventory = 100; //总库存
volatile uint32_t retailCount = 0; //线下销售量
volatile uint32_t onlineCount = 0; //线上销售量

SemaphoreHandle_t xMutexInventory = NULL; //创建信号量Handler

TickType_t timeOut = 1000; //用于获取信号量的Timeout 1000 ticks


void retailTask(void *pvParam) {
  while (1) {

    // 在timeout的时间内如果能够获取就继续
    // 通俗一些:获取钥匙
    if (xSemaphoreTake(xMutexInventory, timeOut) == pdPASS) {
      //被MUTEX保护的内容叫做 Critical Section

      //以下实现了带有随机延迟的 inventory减1;
      //等效为 inventory--; retailCount++;
      uint32_t inv = inventory;
      for (int i; i < random(10, 100); i++) vTaskDelay(pdMS_TO_TICKS(i));
      if (inventory > 0) {
        inventory = inv - 1;
        retailCount++;

        //释放钥匙
        xSemaphoreGive(xMutexInventory);
      } else {
        //无法获取钥匙
      }


    };

    vTaskDelay(100); //老板要求慢一些,客户升级后,可以再加快速度
  }
}

void onlineTask(void *pvParam) {
  while (1) {

    // 在timeout的时间内如果能够获取信号量就继续
    // 通俗一些:获取钥匙
    if (xSemaphoreTake(xMutexInventory, timeOut) == pdPASS) {
      //被MUTEX保护的内容叫做 Critical Section
      //以下实现了带有随机延迟的 inventory减1;
      //等效为 inventory--; retailCount++;
      uint32_t inv = inventory;
      for (int i; i < random(10, 100); i++) vTaskDelay(pdMS_TO_TICKS(i));
      if (inventory > 0) {
        inventory = inv - 1;
        onlineCount++;

        //释放钥匙
        xSemaphoreGive(xMutexInventory);
      } else {
        //无法获取钥匙
      }
    };

    vTaskDelay(100); //老板要求慢一些,客户升级后,可以再加快速度
  }
}


void showTask(void *pvParam) {
  while (1) {

    printf("Inventory : %d\n", inventory);
    printf("  Retail : %d, Online : %d\n", retailCount, onlineCount);


    if (inventory == 0 ) {
      uint32_t totalSales = retailCount + onlineCount;
      printf("-----SALES SUMMARY-----\n");
      printf("  Total Sales:  %d\n", totalSales);
      printf("  OverSales:  %d\n", 100 - totalSales);
    }
    vTaskDelay(pdMS_TO_TICKS(1000));
  }
}

void setup() {
  // put your setup code here, to run once:
  Serial.begin(115200);

  xMutexInventory = xSemaphoreCreateMutex(); //创建MUTEX

  if (xMutexInventory == NULL) {
    printf("No Enough Ram, Unable to Create Semaphore.");
  } else {
    xTaskCreate(onlineTask,
                "Online Channel",
                1024 * 4,
                NULL,
                1,
                NULL);
    xTaskCreate(retailTask,
                "Retail Channel",
                1024 * 4,
                NULL,
                1,
                NULL);
    xTaskCreate(showTask,
                "Display Inventory",
                1024 * 4,
                NULL,
                1,
                NULL);
  }

}

void loop() {
}
| 语法 | 解释 |
|---|---|
| SemaphoreHandle_t xHandler; | 创建Handler |
| xHandler = xSemaphoreCreateMutex(); | 创建一个MUTEX 返回NULL,或者handler |
| xSemaphoreGive(xHandler); | 释放 |
| xSemaphoreTake(xHanlder, timeout); | 指定时间内获取信号量 返回pdPASS, 或者pdFAIL |
MUTEX的工作原理可以想象成共享的资源被锁在了一个箱子里,只有一把钥匙,有钥匙的任务才能对改资源进行访问
值得注意的是,当我们要用钥匙 xSemaphoreTake(xHanlder, timeout);才使用,并且执行完后要立即 xSemaphoreGive(xHandler); 释放钥匙。这个程序在 S2 可以运行!


硬件是真难啊 😭
开发一些大一点的项目用RTOS确实比裸机开发方便多了
哥哥好厉害
Σ(っ °Д °;)っ 成大佬了
@Pudding233
小萌新啊!